When you think of celebrations, what’s the first dessert that comes to mind? For many, it’s the classic Black Forest cake. Its rich chocolate layers, creamy frosting, and tart cherries create a perfect balance that has a special place in our hearts (and stomachs!). I created this post because I know how fun and rewarding it can be to bake and decorate your own cake.
If you’re someone who loves baking or simply enjoys bringing people together over delicious treats, you’re in the right spot. Whether you are planning a birthday party, a family gathering, or just want to impress your friends, these stunning black forest cake designs will take your baking game to the next level.
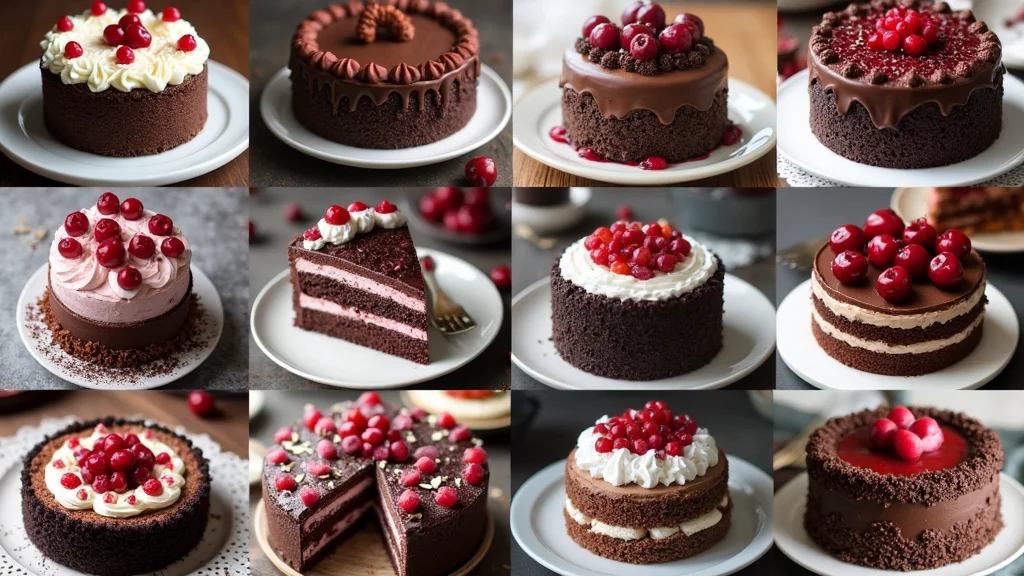
In this post, you’ll find 21 jaw-dropping designs that are not only beautiful but also surprisingly doable. From the elegant Classic Elegance to the playful Mini Black Forest Bites, you’ll discover decorating tips that will help you create cakes that wow your guests. And trust me, design #12 is a show-stopper!
Get ready to turn your kitchen into a sweet haven. You’ll gain inspiration that makes baking enjoyable and rewarding. With a few simple decorating techniques and a sprinkle of creativity, you’ll be serving up cakes that are not just delicious but also a feast for the eyes.
So, let’s dive into these inspiring black forest cake designs that will have everyone asking for seconds!
Key Takeaways
– Discover 21 unique black forest cake designs, ranging from classic styles to modern twists.
– Learn decorating tips to elevate your cakes, including frosting techniques and garnishes.
– Explore alternatives like vegan options and mini cakes for smaller gatherings.
– Get inspired to try unique flavor combinations, such as chocolate mint or salted caramel.
– Find practical advice on presenting your cakes beautifully for any occasion.
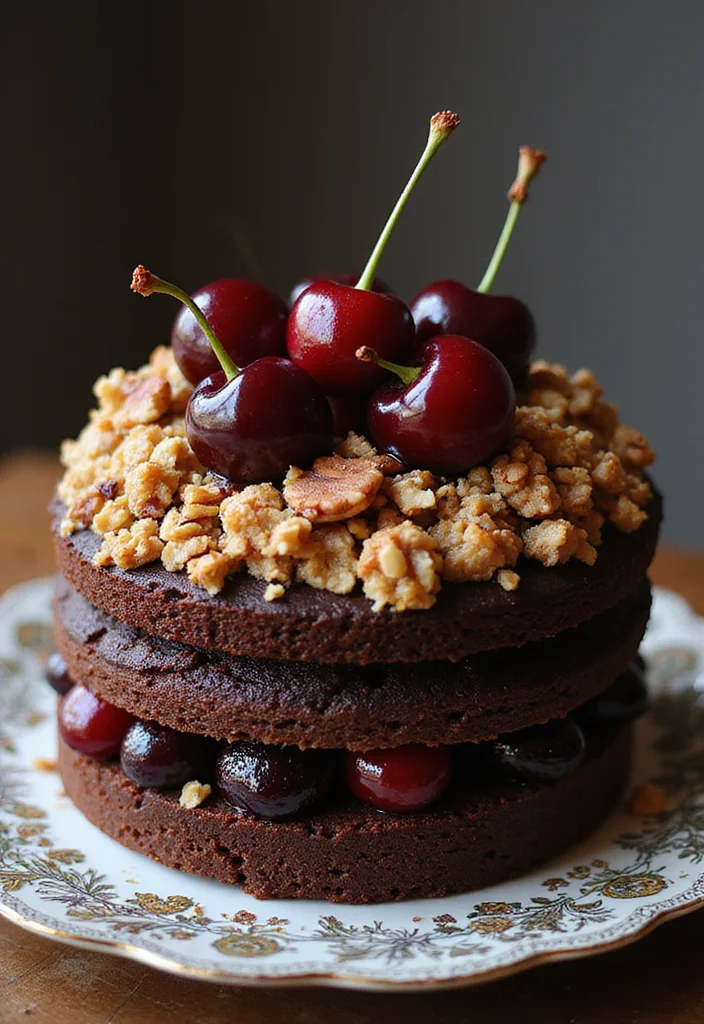
1. Classic Elegance
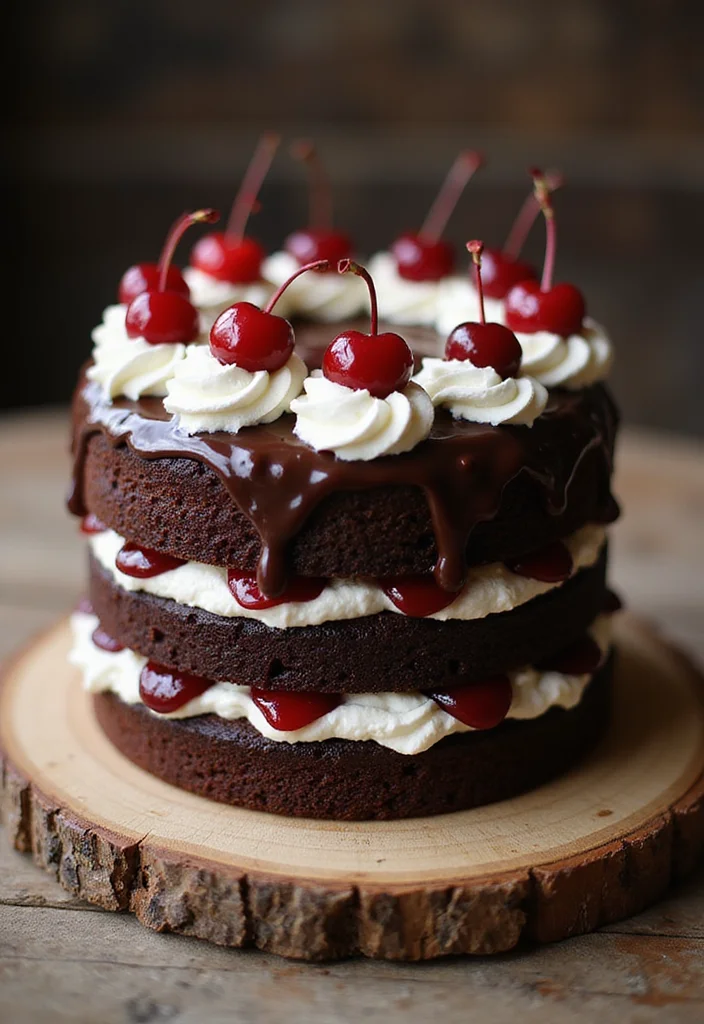
The classic Black Forest cake is a true showstopper. It brings together layers of moist chocolate sponge, fluffy whipped cream, and bright tart cherries. This combination creates a delightful flavor explosion in every bite. The design is simple yet captivating, often topped with fresh cherries that add a rustic charm.
This cake is perfect for any celebration or just to satisfy your sweet tooth. With its rich chocolate flavor and creamy texture, it’s sure to impress your friends and family. It’s the kind of dessert that makes any occasion feel special.
Preparation Overview:
– Servings: 8-10
– Prep Time: 30 minutes
– Cook Time: 35 minutes
– Total Time: 65 minutes
– Calories: Approximately 400 per slice
Nutrition Information (per slice):
– Fat: 22g
– Carbohydrates: 45g
– Protein: 4g
Ingredients:
– 1 ¾ cups all-purpose flour
– 1 ¾ cups sugar
– ¾ cup unsweetened cocoa powder
– 1 ½ tsp baking powder
– 1 ½ tsp baking soda
– 1 tsp salt
– 2 large eggs
– 1 cup buttermilk
– ½ cup vegetable oil
– 2 tsp vanilla extract
– 1 cup boiling water
– 1 cup heavy cream
– 1 cup pitted cherries (fresh or canned)
Instructions:
1. Preheat your oven to 350°F (175°C).
2. Grease and flour two 9-inch round cake pans.
3. In a large bowl, mix flour, sugar, cocoa, baking powder, baking soda, and salt.
4. Add eggs, buttermilk, oil, and vanilla. Mix until well combined.
5. Stir in boiling water until smooth.
6. Divide the batter between the prepared pans and bake for 30-35 minutes.
7. Cool the cakes in the pans for 10 minutes before inverting onto a wire rack.
8. Whip the heavy cream until soft peaks form.
9. Once cooled, layer the cakes with whipped cream and cherries in between.
10. Frost the top and sides with whipped cream, and garnish with more cherries and chocolate shavings.
– Use high-quality cocoa powder for a richer chocolate flavor.
– Chill your mixing bowl when whipping the cream to achieve better volume.
FAQs:
Q: Can I make this cake in advance?
A: Yes! This cake will stay moist for several days when stored in an airtight container.
2. Ombre Chocolate Delight

Why not add a playful twist to the traditional Black Forest cake? The ombre effect created with dark, milk, and white chocolate ganaches offers a stunning visual and a rich flavor profile. Each layer blends seamlessly, inviting everyone to indulge in the delightful chocolate experience.
This design isn’t just about looks; it’s about taste. The varying shades of chocolate create a mouth-watering treat that will be the center of attention at any gathering. With this cake, you can delight your guests with every sweet, creamy bite.
Preparation Overview:
– Servings: 10-12
– Prep Time: 45 minutes
– Cook Time: 40 minutes
– Total Time: 85 minutes
– Calories: Approximately 450 per slice
Nutrition Information (per slice):
– Fat: 26g
– Carbohydrates: 50g
– Protein: 5g
Ingredients:
– 1 ½ cups all-purpose flour
– 1 cup sugar
– ½ cup brown sugar
– ½ cup unsweetened cocoa powder
– 1 tsp baking powder
– 1 tsp baking soda
– ½ tsp salt
– 2 large eggs
– 1 cup milk
– ½ cup vegetable oil
– 2 tsp vanilla extract
– 1 cup boiling water
– 1 cup heavy cream
– 1 cup dark, milk, and white chocolate for ganache
Instructions:
1. Preheat your oven to 350°F (175°C) and grease two 9-inch round cake pans.
2. In a bowl, whisk together flour, sugars, cocoa powder, baking powder, baking soda, and salt.
3. Mix in the eggs, milk, oil, and vanilla until smooth.
4. Stir in boiling water.
5. Pour into prepared pans and bake for 30-40 minutes.
6. Allow cooling completely.
7. For the ganache, melt dark chocolate and cream in a saucepan until smooth. Repeat with milk and white chocolate separately.
8. Layer the cakes with whipped cream and alternate between dark, milk, and white chocolate ganache.
9. Frost the cake with more ganache, creating the ombre effect.
– Use a cake turntable for a smoother frosting finish.
– Melt the chocolate slowly to avoid burning.
FAQs:
Q: Can I use other flavors instead of chocolate?
A: Absolutely! You can swap in different flavored ganaches like caramel or fruit-based ones.
3. Rustic Vintage Charm
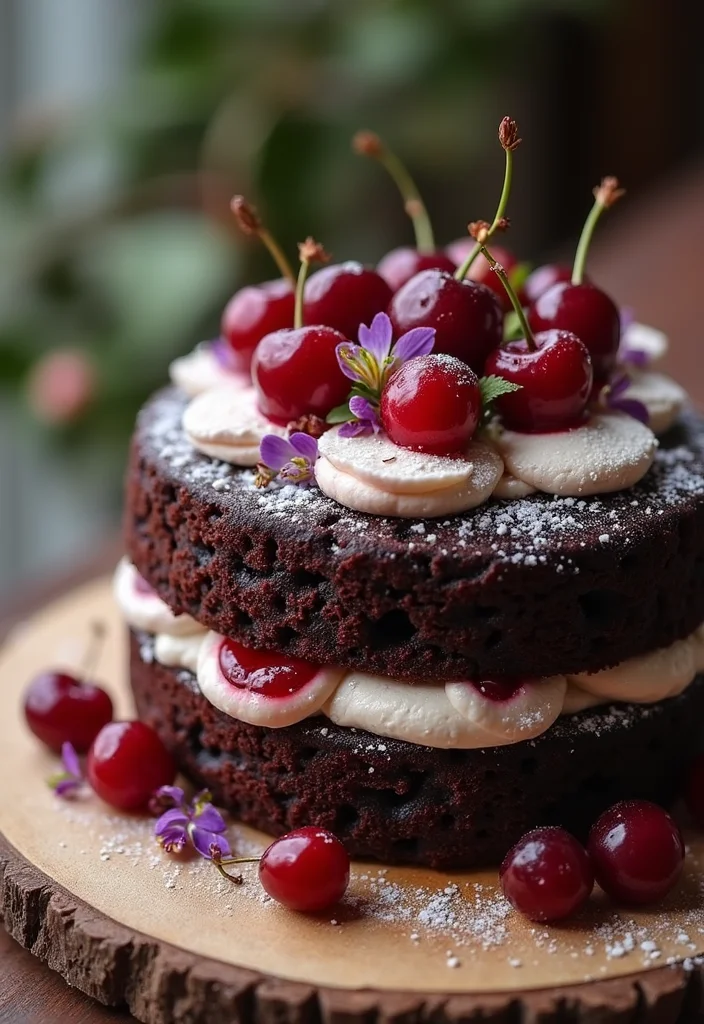
Imagine a cake that brings back the charm of yesteryears. The rustic Black Forest cake design features sweet simplicity with fresh berries and edible flowers. The rough frosting technique adds a homey feel, making each cake unique and inviting.
This design is perfect for intimate gatherings or outdoor weddings. The little imperfections in the frosting add character, making your dessert stand out in a charming way. It’s a delightful way to celebrate any occasion with a touch of nostalgia.
Preparation Overview:
– Servings: 8-10
– Prep Time: 40 minutes
– Cook Time: 30 minutes
– Total Time: 70 minutes
– Calories: Approximately 380 per slice
Nutrition Information (per slice):
– Fat: 20g
– Carbohydrates: 42g
– Protein: 6g
Ingredients:
– 1 ¾ cups all-purpose flour
– 1 ½ cups sugar
– ¾ cup unsweetened cocoa powder
– 3 large eggs
– 1 cup whole milk
– 1 cup butter (softened)
– 1 cup heavy cream
– 1 cup cherry jam
– 1 cup fresh cherries (for decoration)
– Edible flowers (for decoration)
Instructions:
1. Preheat your oven to 350°F (175°C) and prepare two 9-inch round cake pans.
2. In a bowl, cream the butter and sugar until fluffy.
3. Add in eggs one at a time, mixing well after each addition.
4. Gradually incorporate the flour and cocoa, alternating with the milk.
5. Pour into pans and bake for 30 minutes.
6. Cool the cakes on a wire rack, then spread cherry jam between layers.
7. Whip the cream and frost the top and sides roughly for that rustic look.
8. Decorate with fresh cherries and edible flowers.
– Let the cake cool completely before frosting to avoid melting the cream.
– Edible flowers add a lovely touch without overwhelming the design.
FAQs:
Q: What kind of edible flowers can I use?
A: Consider using pansies, violets, or nasturtiums for a colorful and safe decoration.
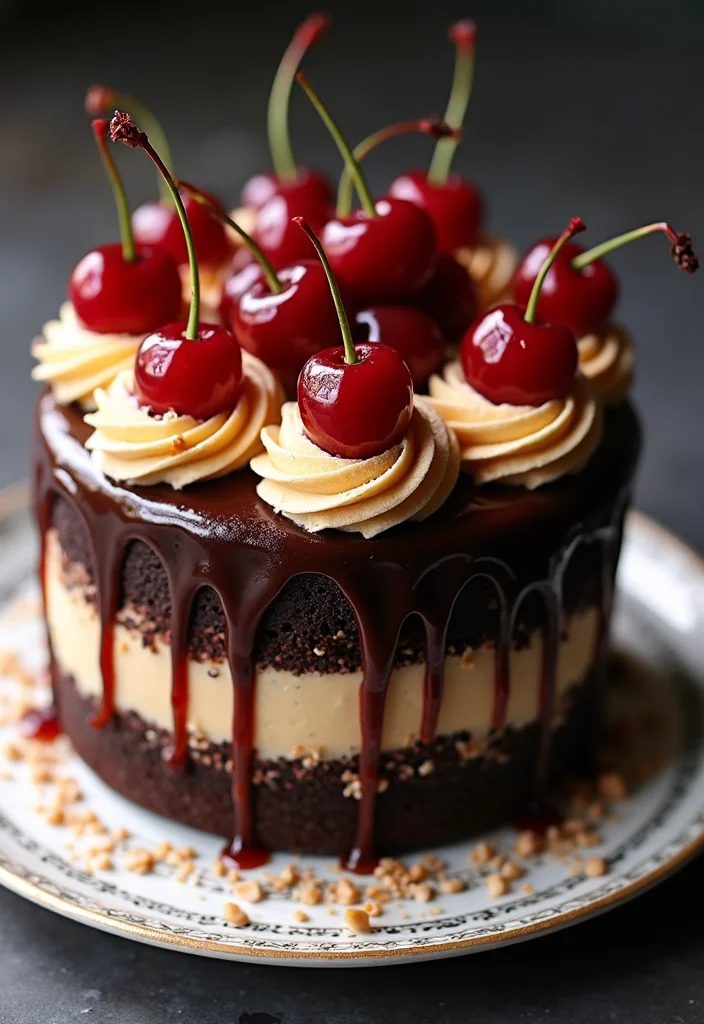
4. Decadent Chocolate Drip
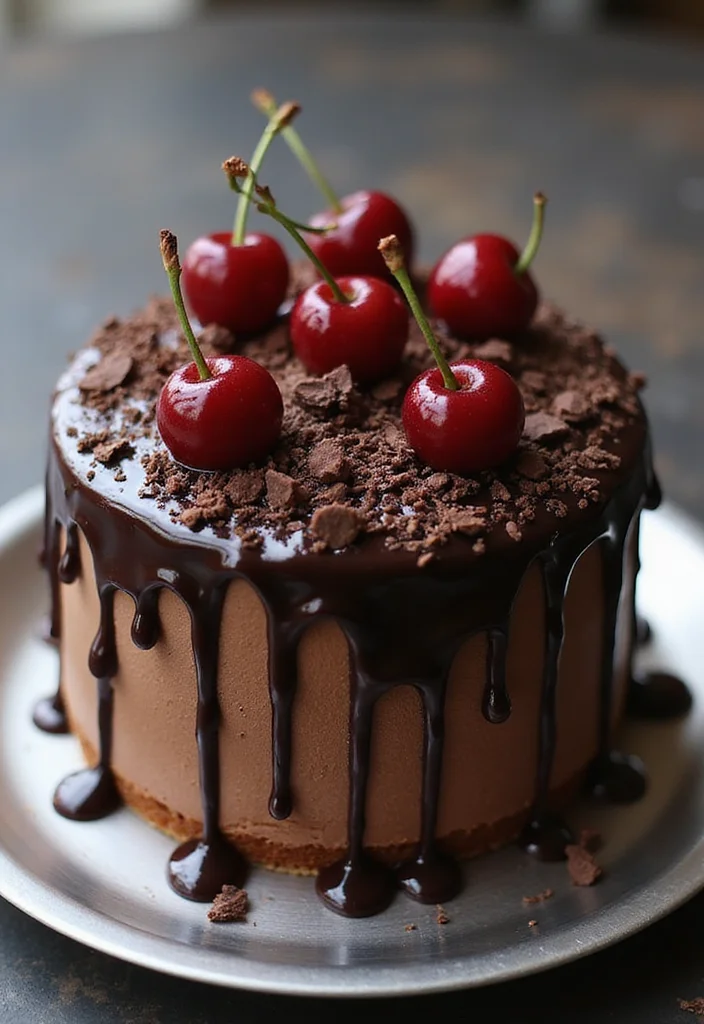
Are you ready for a cake that’s all about indulgence? The decadent chocolate drip Black Forest cake is your answer. Featuring a rich chocolate ganache that drips down the sides, it creates a gorgeous visual and a mouth-watering taste.
This design not only looks stunning but also enhances the chocolate flavor, making it truly irresistible. It’s ideal for special occasions or simply when you’re in the mood for a treat.
Preparation Overview:
– Servings: 10-12
– Prep Time: 60 minutes
– Cook Time: 30 minutes
– Total Time: 90 minutes
– Calories: Approximately 500 per slice
Nutrition Information (per slice):
– Fat: 28g
– Carbohydrates: 45g
– Protein: 6g
Ingredients:
– 2 cups all-purpose flour
– 1 ½ cups sugar
– ¾ cup unsweetened cocoa powder
– 2 large eggs
– 1 cup vegetable oil
– 1 cup buttermilk
– 1 cup boiling water
– 1 cup heavy cream (for whipping)
– 1 cup dark chocolate (for ganache)
– Fresh cherries (for decoration)
Instructions:
1. Preheat your oven to 350°F (175°C) and prepare two 9-inch round cake pans.
2. Combine flour, sugar, cocoa powder, baking powder, and baking soda in a bowl.
3. Add eggs, oil, buttermilk, and boiling water. Mix well until smooth.
4. Bake in the oven for 30-35 minutes.
5. Cool the cakes completely on a wire rack.
6. For the ganache, heat heavy cream and pour over the chocolate until melted; stir until smooth.
7. Layer the cakes with whipped cream and cherries.
8. Pour the ganache over the top, allowing some to drip down the sides.
9. Garnish with fresh cherries and chocolate shavings.
– A squeeze bottle can help control the drip effect.
– Ensure the ganache is slightly warm for perfect dripping.
FAQs:
Q: How do I know when my ganache is ready?
A: If it’s pourable but not too hot to melt your cream, it’s just right!
5. Floral Fantasy
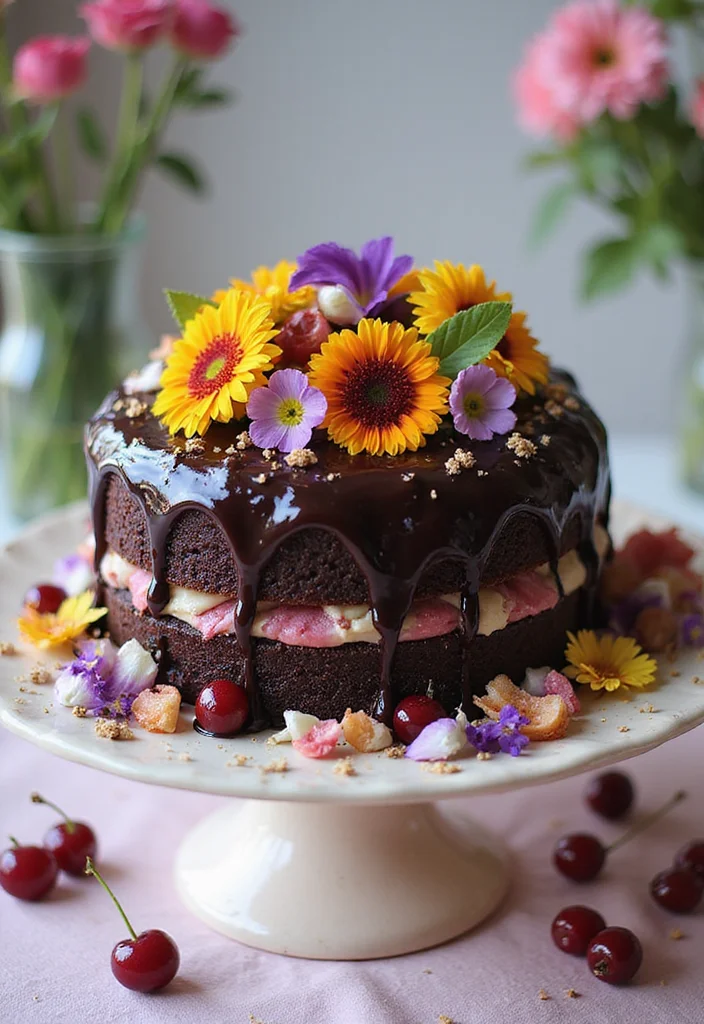
Step into a beautiful garden with this floral fantasy Black Forest cake design. By adding vibrant edible flowers alongside the traditional elements, you create a cake that is as delightful to look at as it is to eat. It seamlessly blends nature’s beauty with a delicious mix of flavors.
The flowers, such as violets, roses, and pansies, not only enhance the cake visually but also provide a fresh taste that perfectly complements the rich chocolate and cream. This design is perfect for spring or summer celebrations, making it a standout piece at any gathering.
Preparation Overview:
– Servings: 10-12
– Prep Time: 50 minutes
– Cook Time: 35 minutes
– Total Time: 85 minutes
– Calories: Approximately 420 per slice
Nutrition Information (per slice):
– Fat: 25g
– Carbohydrates: 45g
– Protein: 6g
Ingredients:
– 1 ¾ cups all-purpose flour
– 1 ½ cups sugar
– ¾ cup unsweetened cocoa powder
– 2 large eggs
– 1 cup buttermilk
– 1 cup vegetable oil
– 1 tsp vanilla extract
– 1 cup heavy cream
– Edible flowers for decoration
– Fresh cherries
Instructions:
1. Preheat oven to 350°F (175°C) and grease two 9-inch round cake pans.
2. In a bowl, mix flour, sugar, cocoa powder, baking powder, and baking soda.
3. Add in eggs, buttermilk, oil, and vanilla.
4. Bake for 30-35 minutes. Cool completely.
5. For the frosting, whip heavy cream until soft peaks form.
6. Layer the cakes with whipped cream and cherries in between.
7. Frost the top and edges with whipped cream.
8. Decorate with edible flowers and cherries for a fresh look.
– Choose flowers that are safe for consumption.
– Be gentle when placing flowers to avoid crushing them.
FAQs:
Q: Can I use dried flowers?
A: It’s best to use fresh flowers as they have a better taste and look.
6. Vegan Bliss
Even those who avoid dairy can savor a delicious Black Forest cake! This vegan version swaps out traditional ingredients for plant-based options, ensuring everyone can indulge. With dark cocoa powder and a rich cherry filling, you won’t miss the eggs or dairy at all.
This cake is not only moist and fluffy but also bursting with flavor, making it a crowd-pleaser for any occasion. Top it off with whipped coconut cream for a delightful finish that everyone will love.
Preparation Overview:
– Servings: 10-12
– Prep Time: 35 minutes
– Cook Time: 35 minutes
– Total Time: 70 minutes
– Calories: Approximately 350 per slice
Nutrition Information (per slice):
– Fat: 15g
– Carbohydrates: 56g
– Protein: 4g
Ingredients:
– 1 ½ cups all-purpose flour
– 1 cup sugar
– ¾ cup unsweetened cocoa powder
– 1 cup almond milk (or any plant-based milk)
– ½ cup vegetable oil
– 2 tsp apple cider vinegar
– 1 cup pitted cherries (fresh or frozen)
– 1 can coconut cream (for whipping)
Instructions:
1. Preheat your oven to 350°F (175°C) and prepare two 9-inch round cake pans.
2. In a bowl, combine flour, sugar, cocoa powder, and baking soda.
3. Mix in almond milk, oil, and vinegar until well combined.
4. Divide the batter between the prepared pans and bake for 30-35 minutes.
5. Cool the cakes completely.
6. For the whipped cream, chill a can of coconut cream and whip until soft peaks form.
7. Layer the cakes with cherry filling in between and frost with whipped coconut cream.
8. Top with extra cherries for decoration.
– Always check for vegan chocolate if you want a chocolatey flavor.
– Ensure your coconut cream is properly chilled for the best whipping results.
FAQs:
Q: Can I substitute the coconut cream?
A: You can use any plant-based whipped cream alternative, but coconut adds a great flavor.
7. Chocolate Hazelnut Heaven
Treat yourself to the delicious pairing of chocolate and hazelnuts with this Black Forest cake design. Adding hazelnut cream gives a nutty depth that beautifully complements the rich chocolate layers. Each bite combines smooth hazelnut with decadent chocolate, creating a dessert that’s truly special.
This cake is perfect for hazelnut lovers or anyone looking for a twist on the classic. It’s a delicious way to elevate your dessert game and impress your guests.
Preparation Overview:
– Servings: 10-12
– Prep Time: 60 minutes
– Cook Time: 30 minutes
– Total Time: 90 minutes
– Calories: Approximately 480 per slice
Nutrition Information (per slice):
– Fat: 25g
– Carbohydrates: 50g
– Protein: 8g
Ingredients:
– 1 ¾ cups all-purpose flour
– 1 cup sugar
– ½ cup unsweetened cocoa powder
– 2 large eggs
– 1 cup milk
– ½ cup vegetable oil
– 1 cup hazelnut cream
– 1 cup heavy cream (for whipping)
– Fresh cherries for topping
Instructions:
1. Preheat your oven to 350°F (175°C) and grease two 9-inch round cake pans.
2. In a bowl, mix flour, sugar, cocoa powder, baking powder, and baking soda.
3. Add in eggs, milk, oil, and hazelnut cream. Mix until smooth.
4. Divide the batter between the prepared pans and bake for 30-35 minutes.
5. Cool completely and whip the heavy cream.
6. Layer the cakes with whipped cream and fresh cherries.
7. Frost the top and sides with more whipped cream and garnish with hazelnuts.
– Use toasted hazelnuts for enhanced flavor.
– Ensure the cream is well chilled for easy whipping.
FAQs:
Q: Can I make this hazelnut cake gluten-free?
A: Yes! Substitute all-purpose flour with a gluten-free flour blend.
8. Mini Black Forest Bites
Looking for a fun party treat? Mini Black Forest cakes are the perfect solution! These adorable bite-sized versions are layered with chocolate cake, whipped cream, and cherry filling, making them easy to enjoy without any utensils.
Each mini cake is delightful and allows guests to sample multiple flavors at events. Plus, they’re super fun to decorate, making them a hit at any gathering.
Preparation Overview:
– Servings: 12-15 mini cakes
– Prep Time: 30 minutes
– Cook Time: 20 minutes
– Total Time: 50 minutes
– Calories: Approximately 250 per bite
Nutrition Information (per bite):
– Fat: 12g
– Carbohydrates: 32g
– Protein: 3g
Ingredients:
– 1 cup all-purpose flour
– ¾ cup sugar
– ½ cup unsweetened cocoa powder
– 1 large egg
– ½ cup milk
– ½ cup vegetable oil
– 1 cup whipped cream
– 1 cup cherry filling (fresh or canned)
Instructions:
1. Preheat your oven to 350°F (175°C) and prepare a mini muffin tin.
2. In a bowl, mix flour, sugar, cocoa powder, egg, milk, and oil until well combined.
3. Fill each mini muffin cavity halfway and bake for 15-20 minutes.
4. Once cooled, slice the top off to create a flat surface.
5. Layer with whipped cream and cherry filling, then replace the tops.
6. Frost the entire mini cake with more whipped cream and garnish with cherries.
– Use a piping bag for a more elegant frosting application.
– Vary the toppings with chocolate shavings or nuts for extra texture.
FAQs:
Q: Can I make these ahead of time?
A: Yes! Store them in an airtight container in the fridge for up to two days.
9. Chocolate Raspberry Bliss
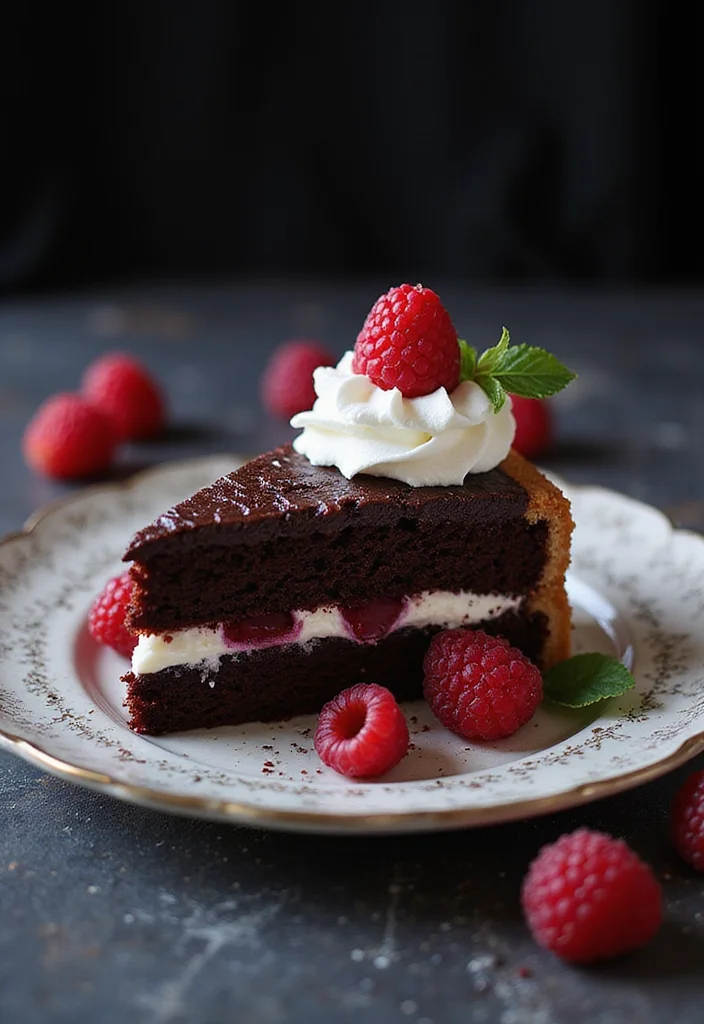
Elevate your dessert game by swapping cherries for tangy raspberries in this Black Forest cake design! The combination of rich chocolate and tart raspberries creates a unique flavor profile that will surprise and delight.
The bright red raspberries contrast beautifully with the chocolate, making this cake a stunning centerpiece. Each bite offers a burst of flavor that pairs perfectly with the luscious cream.
Preparation Overview:
– Servings: 10-12
– Prep Time: 45 minutes
– Cook Time: 30 minutes
– Total Time: 75 minutes
– Calories: Approximately 420 per slice
Nutrition Information (per slice):
– Fat: 21g
– Carbohydrates: 50g
– Protein: 5g
Ingredients:
– 1 ¾ cups all-purpose flour
– 1 cup sugar
– ¾ cup unsweetened cocoa powder
– 2 large eggs
– 1 cup buttermilk
– ½ cup vegetable oil
– 1 cup fresh raspberries
– 1 cup heavy cream
Instructions:
1. Preheat oven to 350°F (175°C) and prepare two 9-inch round cake pans.
2. Mix flour, sugar, cocoa powder, baking powder, and baking soda in a bowl.
3. Add in eggs, buttermilk, oil, and mix until smooth.
4. Pour batter into pans and bake for 30-35 minutes. Cool completely.
5. For the frosting, whip heavy cream until soft peaks form.
6. Layer cakes with raspberries and whipped cream.
7. Frost the top and edges with whipped cream, decorate with more raspberries.
– Use fresh raspberries for the best flavor.
– The tartness of the raspberries balances the sweetness of the cake beautifully.
FAQs:
Q: Can I use frozen raspberries?
A: Yes, but make sure to thaw and drain them before using.
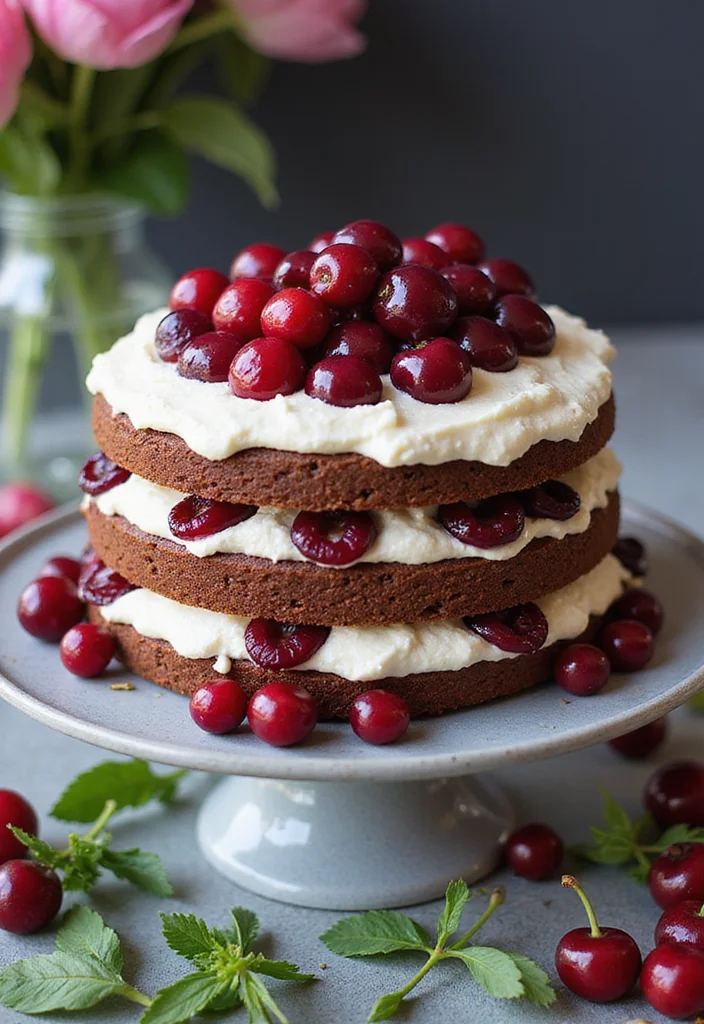
10. Layered Celebration Cake
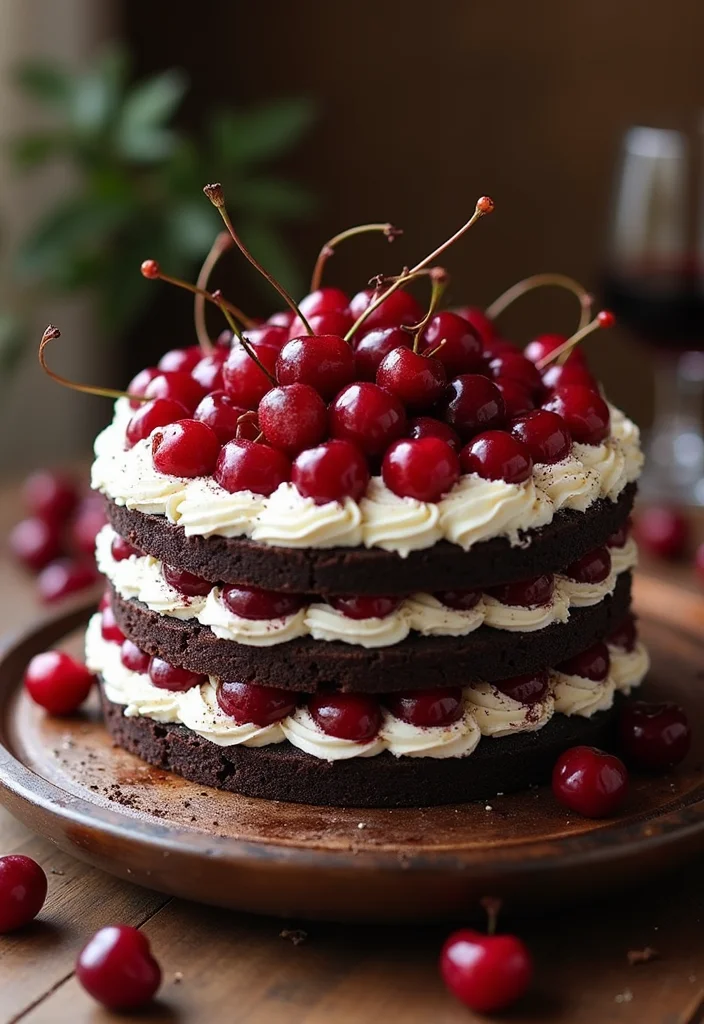
Take your Black Forest cake to new heights with a stunning multi-layered design! Each layer brings a new taste and texture, showcasing your baking skills while creating a beautiful visual effect.
Mix in different fillings like cherries, raspberries, or even chocolate ganache for extra flair. This cake is perfect for birthdays or any grand celebration, making it a memorable centerpiece.
Preparation Overview:
– Servings: 12-15
– Prep Time: 1 hour
– Cook Time: 35 minutes
– Total Time: 95 minutes
– Calories: Approximately 550 per slice
Nutrition Information (per slice):
– Fat: 30g
– Carbohydrates: 60g
– Protein: 7g
Ingredients:
– 2 cups all-purpose flour
– 1 ½ cups sugar
– ¾ cup unsweetened cocoa powder
– 3 large eggs
– 1 cup buttermilk
– 1 cup vegetable oil
– 1 cup heavy cream (for whipping)
– 1 ½ cups cherry filling (fresh or canned)
Instructions:
1. Preheat oven to 350°F (175°C) and prepare three 9-inch round cake pans.
2. Mix flour, sugar, cocoa powder, baking powder, and baking soda in a bowl.
3. Combine eggs, buttermilk, oil, and milk in another bowl.
4. Slowly add wet ingredients to the dry ones and mix until smooth.
5. Divide the batter among the pans, bake for about 30-35 minutes.
6. Cool completely, then layer with whipped cream and filling of your choice between each layer.
7. Frost the top and sides of the cake with whipped cream and decorate.
– Use a serrated knife to slice the layers evenly.
– Chill the cake before frosting for better stability.
FAQs:
Q: How many layers can I add?
A: You can add as many layers as your cake pans can hold; just be sure to balance the fillings.
Fun fact: Layered Black Forest cake designs can serve 12–15 people, turning one dessert into a showstopper. Add cherries, raspberries, and chocolate ganache for extra flair and a photo-worthy centerpiece.
11. Chocolate Chip Surprise
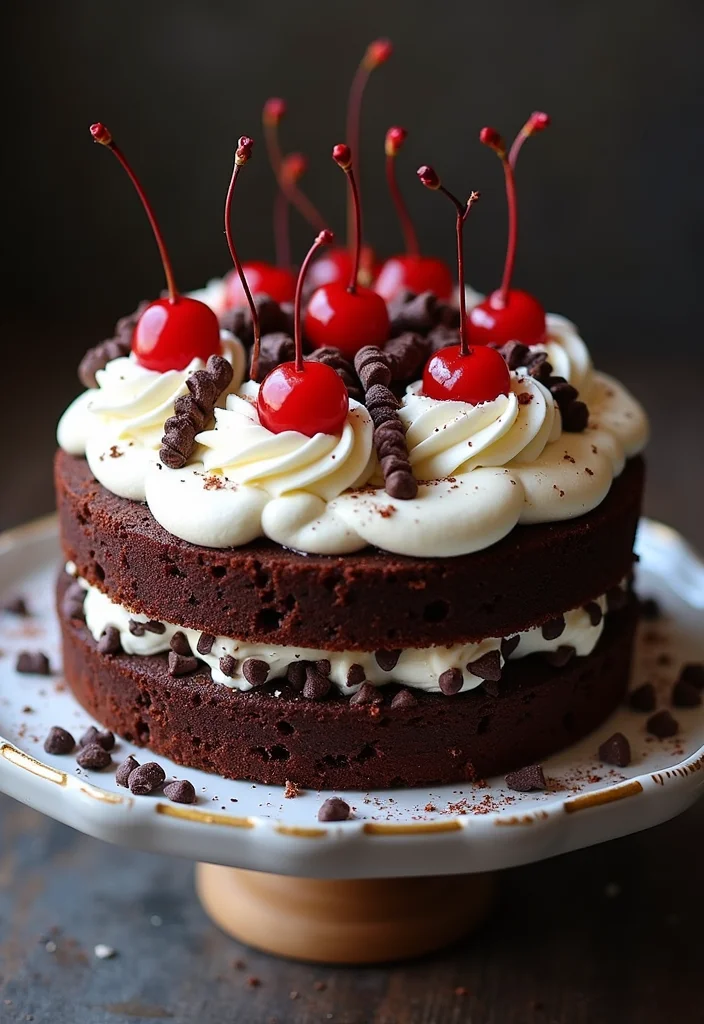
Add a fun twist to your Black Forest cake by incorporating chocolate chips into the layers. This design creates delightful surprises in every bite, offering a texture contrast with the fluffy cream.
The chocolate chips melt slightly during baking, creating pockets of gooey chocolate that complement the rich cherry filling perfectly. This cake is a must-try for chocolate lovers everywhere!
Preparation Overview:
– Servings: 10-12
– Prep Time: 40 minutes
– Cook Time: 30 minutes
– Total Time: 70 minutes
– Calories: Approximately 460 per slice
Nutrition Information (per slice):
– Fat: 25g
– Carbohydrates: 48g
– Protein: 6g
Ingredients:
– 1 ½ cups all-purpose flour
– 1 cup sugar
– ¾ cup unsweetened cocoa powder
– 2 large eggs
– 1 cup buttermilk
– ½ cup vegetable oil
– 1 cup chocolate chips (semi-sweet)
– 1 cup heavy cream
– 1 cup cherry filling
Instructions:
1. Preheat oven to 350°F (175°C) and prepare two 9-inch round cake pans.
2. In a bowl, mix together flour, sugar, cocoa powder, baking powder, and baking soda.
3. Add eggs, buttermilk, and oil, stirring until smooth.
4. Fold in chocolate chips.
5. Divide batter into prepared pans and bake for 30-35 minutes.
6. Cool completely, then layer with cherry filling and whipped cream.
7. Frost the top and sides with whipped cream, garnishing with chocolate curls.
– Use mini chocolate chips for a more even distribution.
– Ensure that the cake cools completely to avoid melting the cream.
FAQs:
Q: Can I use white chocolate chips instead?
A: Yes, white chocolate adds a sweet contrast but won’t be as rich.
12. Show-Stopping Tiered Cake
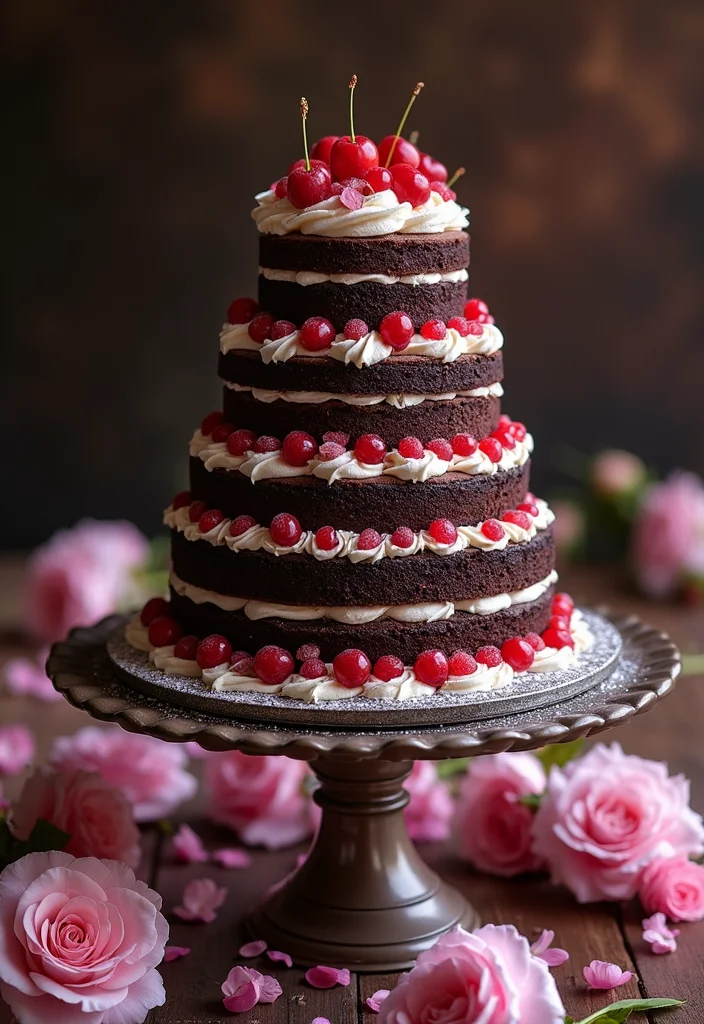
Get ready to amaze your guests with an extravagant tiered Black Forest cake! Stacking multiple layers of chocolate sponge, whipped cream, and cherries creates a stunning centerpiece for weddings or significant celebrations.
This design not only looks impressive but allows for a variety of flavors in each tier. Experiment with different berry fillings or ganaches to keep things exciting. Your guests will be captivated by this dessert masterpiece!
Preparation Overview:
– Servings: 20-25
– Prep Time: 1 hour
– Cook Time: 50 minutes
– Total Time: 110 minutes
– Calories: Approximately 600 per slice
Nutrition Information (per slice):
– Fat: 35g
– Carbohydrates: 55g
– Protein: 9g
Ingredients:
– 4 cups all-purpose flour
– 3 cups sugar
– 1 ½ cups unsweetened cocoa powder
– 6 large eggs
– 2 cups buttermilk
– 1 cup vegetable oil
– 2 cups heavy cream (for whipping)
– 2 cups cherry filling (fresh or canned)
Instructions:
1. Preheat oven to 350°F (175°C) and prepare multiple round cake pans (6-inch, 8-inch, 10-inch).
2. In a bowl, mix flour, sugar, cocoa powder, baking powder, and baking soda.
3. Add in eggs, buttermilk, and oil, mixing until combined.
4. Divide batter among the pans and bake for 30-50 minutes depending on size.
5. Cool layers completely before frosting.
6. Whip cream until stiff peaks form and layer between tiers with cherry filling.
7. Frost the entire cake and decorate according to your theme.
– Use dowel rods for stability between tiers.
– Chill the cake after assembly for a few hours for easier slicing.
FAQs:
Q: What’s the best way to transport a tiered cake?
A: Use a sturdy cake box and secure the tiers with dowels to prevent shifting.
13. Chocolate Mint Fusion
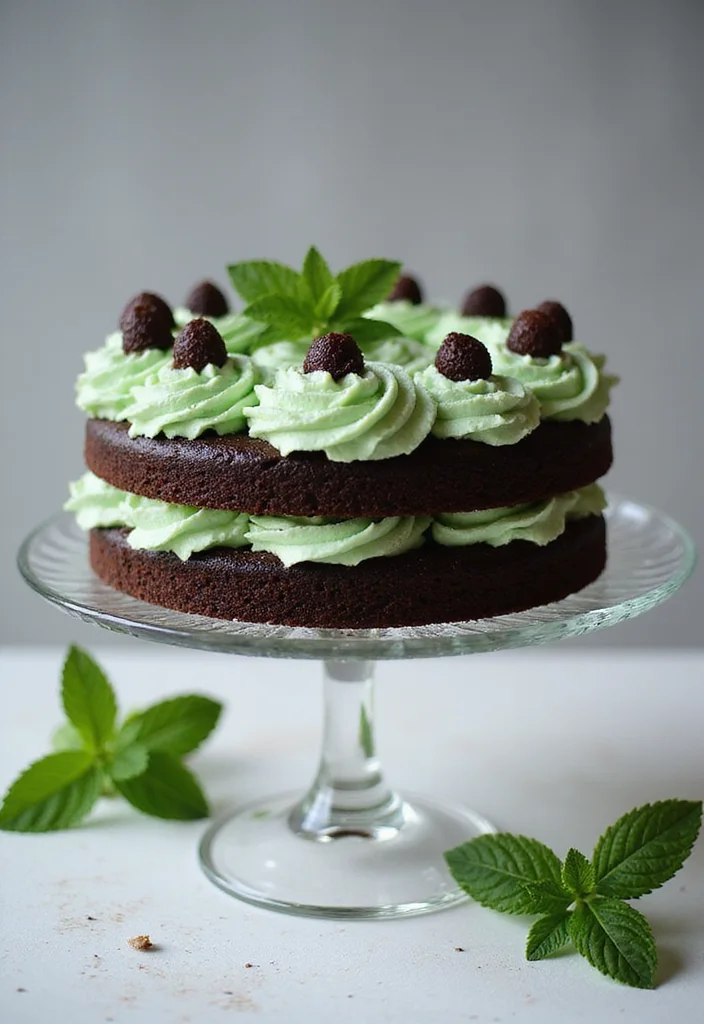
If you crave a refreshing twist, try the chocolate mint Black Forest cake! The combination of rich chocolate cake with a minty whipped cream filling offers a cool contrast to the dense chocolate layers.
This cake tastes like a stroll through a garden of chocolate mints, making it an exciting option for chocolate enthusiasts. It’s sure to impress at parties or holiday gatherings!
Preparation Overview:
– Servings: 10-12
– Prep Time: 50 minutes
– Cook Time: 30 minutes
– Total Time: 80 minutes
– Calories: Approximately 390 per slice
Nutrition Information (per slice):
– Fat: 22g
– Carbohydrates: 45g
– Protein: 5g
Ingredients:
– 1 ¾ cups all-purpose flour
– 1 cup sugar
– ¾ cup unsweetened cocoa powder
– 2 large eggs
– 1 cup buttermilk
– ½ cup vegetable oil
– 1 tsp peppermint extract
– 1 cup heavy cream (for whipping)
– Fresh mint leaves for decoration
Instructions:
1. Preheat your oven to 350°F (175°C) and prepare two 9-inch round cake pans.
2. Combine flour, sugar, cocoa powder, baking powder, and baking soda in a bowl.
3. Mix in eggs, buttermilk, oil, and peppermint extract until smooth.
4. Bake for 30-35 minutes. Cool completely.
5. Whip cream with a hint of peppermint for a refreshing filling.
6. Layer cakes with whipped cream and garnish with fresh mint leaves.
– Use fresh mint leaves for decoration for a pop of color and flavor.
– Avoid overmixing the batter to keep the cake light and fluffy.
FAQs:
Q: Can I use mint chocolate chips?
A: Absolutely! They add extra flavor and texture to the cake.
14. Salted Caramel Drizzle
Take your Black Forest cake to new levels with a luxurious salted caramel drizzle! This design melds the sweetness of caramel with a pinch of salt, perfectly enhancing the rich chocolate and cherry flavors.
Not only does the caramel add flavor, but it also creates a stunning visual appeal. Each slice showcases this beautiful drizzle, making it a standout dessert for any gathering.
Preparation Overview:
– Servings: 10-12
– Prep Time: 50 minutes
– Cook Time: 30 minutes
– Total Time: 80 minutes
– Calories: Approximately 480 per slice
Nutrition Information (per slice):
– Fat: 27g
– Carbohydrates: 50g
– Protein: 6g
Ingredients:
– 2 cups all-purpose flour
– 1 ½ cups sugar
– ¾ cup unsweetened cocoa powder
– 3 large eggs
– 1 cup buttermilk
– ½ cup vegetable oil
– 1 cup heavy cream (for whipping)
– 1 cup salted caramel sauce
Instructions:
1. Preheat your oven to 350°F (175°C) and prepare two 9-inch round cake pans.
2. In a bowl, mix flour, sugar, cocoa powder, baking powder, and baking soda.
3. Combine eggs, buttermilk, and oil in another bowl and mix well.
4. Gradually add wet ingredients to dry ingredients until smooth.
5. Bake for 30-35 minutes and allow cooling.
6. Whip the heavy cream until peaks form and layer it between cakes along with the caramel.
7. Drizzle extra caramel on top for added flair.
– Use homemade caramel sauce for a richer flavor.
– A pinch of sea salt on top enhances the flavor even more.
FAQs:
Q: Can I make the caramel in advance?
A: Yes, caramel can be made ahead and stored in the fridge; just warm it slightly before using.
15. S’mores Black Forest Cake
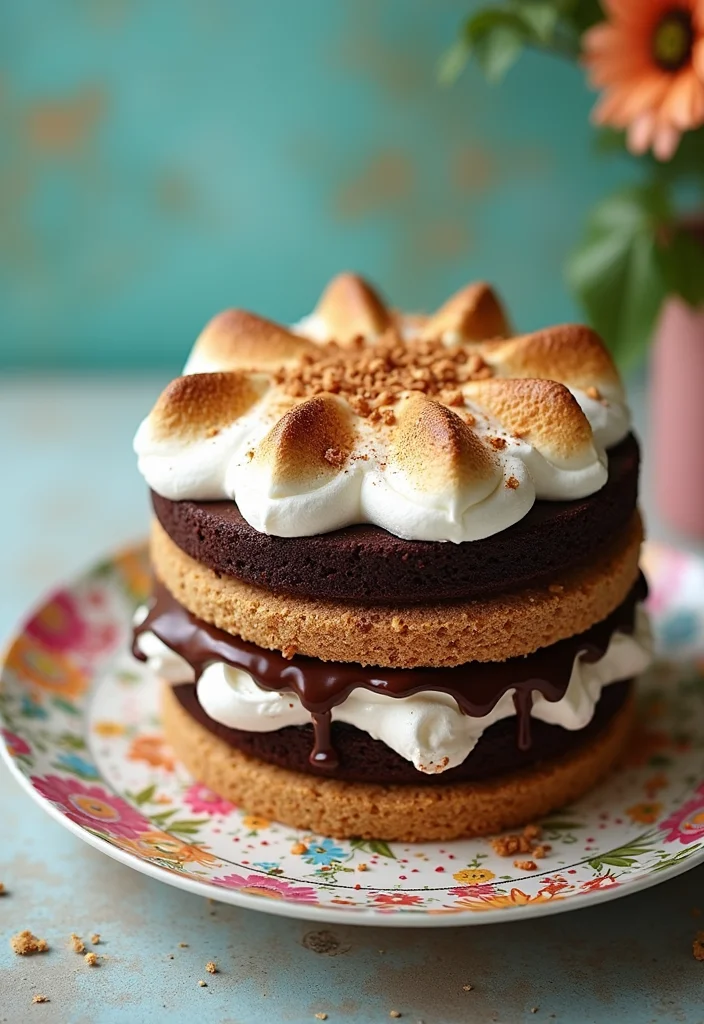
Bring the flavors of summer campfires to your dessert table with this S’mores-inspired Black Forest cake! Combining graham cracker crumbs with marshmallow frosting, this design captures all the tasty elements of a classic campfire treat.
Each slice showcases layers of rich chocolate with hints of graham cracker crunch, while the marshmallow cream topping evokes nostalgic memories. This cake is perfect for summer parties or anyone looking for a fun twist on the classic!
Preparation Overview:
– Servings: 10-12
– Prep Time: 1 hour
– Cook Time: 30 minutes
– Total Time: 90 minutes
– Calories: Approximately 500 per slice
Nutrition Information (per slice):
– Fat: 28g
– Carbohydrates: 52g
– Protein: 6g
Ingredients:
– 2 cups all-purpose flour
– 1 ½ cups sugar
– ¾ cup unsweetened cocoa powder
– 2 large eggs
– 1 cup buttermilk
– ½ cup vegetable oil
– 1 cup marshmallow fluff
– 1 cup heavy cream (for whipped topping)
– Graham cracker crumbs for garnish
Instructions:
1. Preheat your oven to 350°F (175°C) and prepare two 9-inch round cake pans.
2. Mix the flour, sugar, cocoa, baking powder, and baking soda in a bowl.
3. Combine eggs, buttermilk, and oil, mixing until smooth.
4. Pour the batter into the prepared pans and bake for 30-35 minutes. Cool completely.
5. Whip the heavy cream to soft peaks, fold in marshmallow fluff.
6. Layer the cakes with marshmallow frosting and sprinkle with graham cracker crumbs.
7. Frost the top and sides with remaining cream and garnish with more crumbs.
– Use mini marshmallows for added texture inside the cake.
– Chill the cake for a bit before serving for better slicing.
FAQs:
Q: What’s the best way to store leftovers?
A: Keep the cake in an airtight container in the fridge for up to 3 days.
16. Chocolate Cherry Parfait
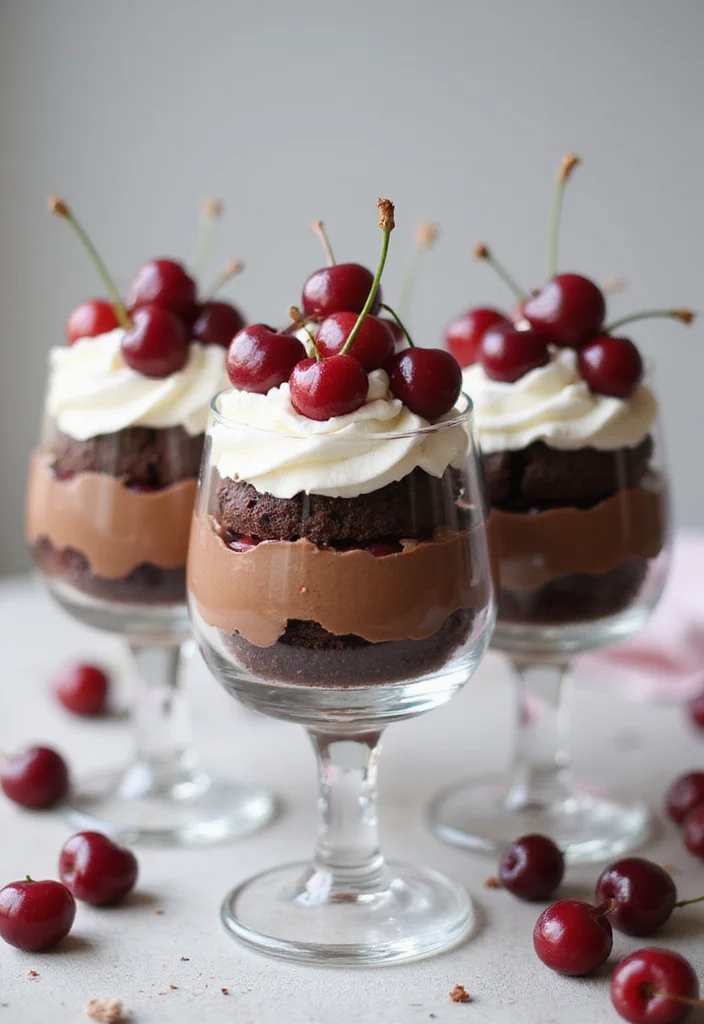
Why settle for just cake when you can create an elegant parfait? This Chocolate Cherry Parfait layers chocolate cake, whipped cream, and cherry filling in a clear glass, showcasing the beautiful layers like a work of art.
Perfect for individual servings, these parfaits are not only delightful to eat but also elevate dessert to a special occasion without needing to bake an entire cake. They are ideal for gatherings or a cozy night in!
Preparation Overview:
– Servings: 6-8
– Prep Time: 20 minutes
– Cook Time: 30 minutes
– Total Time: 50 minutes
– Calories: Approximately 360 per serving
Nutrition Information (per serving):
– Fat: 18g
– Carbohydrates: 45g
– Protein: 5g
Ingredients:
– 1 cup chocolate cake, crumbled
– 1 cup cherry pie filling
– 1 cup whipped cream
– Chocolate shavings for garnish
Instructions:
1. Prepare mini glass jars or dessert cups.
2. Layer crumbled chocolate cake and cherry pie filling in the glass.
3. Top with whipped cream, creating another layer.
4. Repeat layers until the glass is full, finishing with whipped cream.
5. Garnish with chocolate shavings or cherries.
– Use store-bought cake for convenience.
– Chill the parfaits for an hour before serving for better flavor melding.
FAQs:
Q: Can I customize the layers?
A: Absolutely! You can substitute with other fruits or cake flavors.
17. Chocolate Cherry Cheesecake
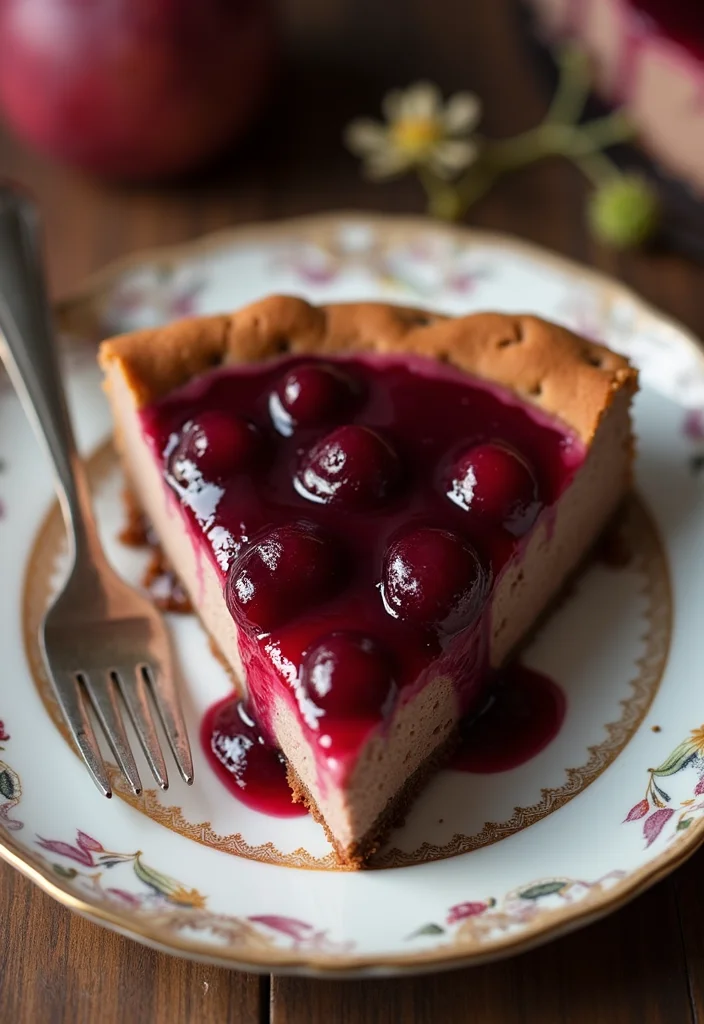
Combine two beloved desserts into one with a chocolate cherry cheesecake! This creation merges the creamy richness of cheesecake with the vibrant flavors of a Black Forest cake.
Featuring a chocolate cookie crust, creamy filling, and cherry topping, this dessert is ideal for special occasions. It’s impressive yet surprisingly easy to make, leaving everyone craving seconds!
Preparation Overview:
– Servings: 10-12
– Prep Time: 30 minutes
– Cook Time: 60 minutes
– Total Time: 90 minutes
– Calories: Approximately 550 per slice
Nutrition Information (per slice):
– Fat: 34g
– Carbohydrates: 45g
– Protein: 8g
Ingredients:
– 1 ½ cups chocolate cookie crumbs
– ½ cup melted butter
– 2 packages (8 oz each) cream cheese
– 1 cup sugar
– 3 large eggs
– 1 cup cherry pie filling
Instructions:
1. Preheat oven to 325°F (165°C) and prepare a springform pan.
2. Combine cookie crumbs and melted butter, press into the bottom of the pan.
3. In a mixing bowl, beat cream cheese and sugar until smooth.
4. Add eggs one at a time, mixing well after each addition.
5. Pour over the crust and bake for 50-60 minutes. Cool completely.
6. Top with cherry pie filling before serving.
– Chill the cheesecake overnight for the best texture.
– Use a water bath to prevent cracking.
FAQs:
Q: Can I make this cheesecake ahead of time?
A: Yes, it can be made up to two days in advance and stored in the refrigerator.
18. Black Forest Cake Pops
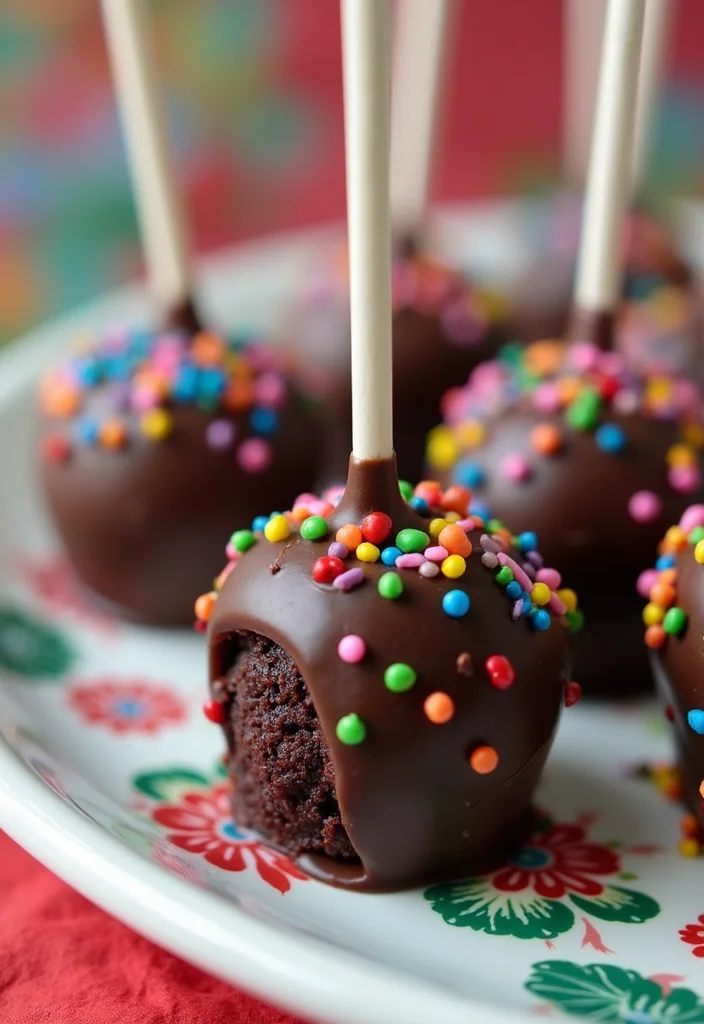
Who doesn’t love cake pops? These bite-sized treats are a fun way to enjoy the classic flavors of Black Forest cake. Made by combining crumbled cake with frosting, they are rolled into balls and coated in chocolate.
Perfect for parties, cake pops provide a portable dessert option without the fuss of slicing a cake. They are also incredibly easy to decorate, so feel free to get creative with colorful sprinkles or cherry toppings!
Preparation Overview:
– Servings: 20 pops
– Prep Time: 30 minutes
– Cook Time: 30 minutes
– Total Time: 60 minutes
– Calories: Approximately 150 per pop
Nutrition Information (per pop):
– Fat: 8g
– Carbohydrates: 20g
– Protein: 2g
Ingredients:
– 2 cups leftover Black Forest cake, crumbled
– ½ cup frosting (chocolate or cream cheese)
– 2 cups chocolate for coating
– Sprinkles or other decorations
Instructions:
1. Mix crumbled cake with frosting until well combined.
2. Roll mixture into small balls and place on a baking sheet.
3. Freeze for 15-20 minutes until firm.
4. Melt chocolate, dip the end of each stick into chocolate, then insert it into the cake ball.
5. Coat the balls in melted chocolate and add decorations as desired.
6. Let them set on a wire rack.
– Use a variety of coatings, such as white chocolate or colored candy melts.
– Experiment with fillings like cherry or raspberry jam inside the pops.
FAQs:
Q: How do I store cake pops?
A: Keep them in the refrigerator in an airtight container for up to a week.
Did you know cake pops cut party prep time by up to 40%? These portable bites let you enjoy blackforest cake designs in bite-sized form without slicing a cake, and they’re easy to decorate with cherry toppers.
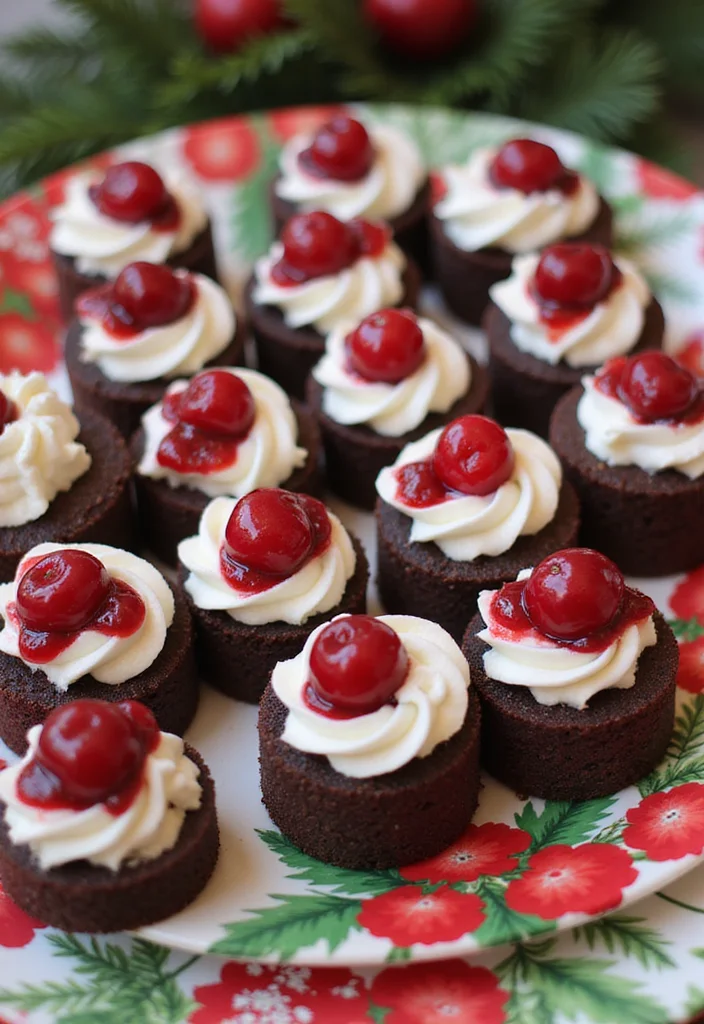
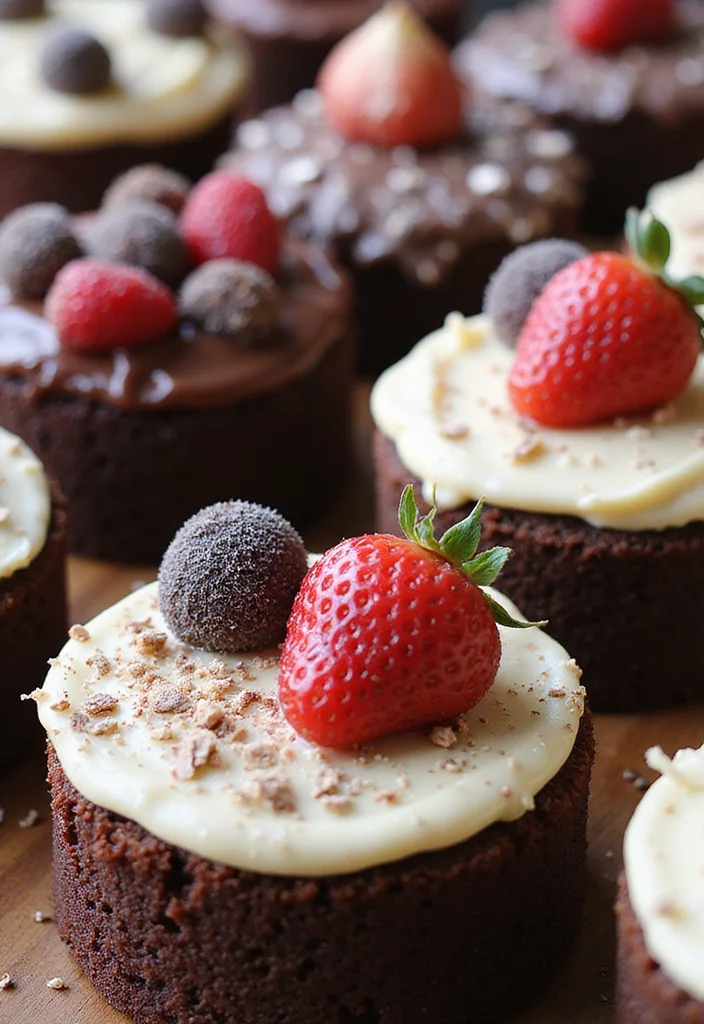
19. Black Forest Cupcakes
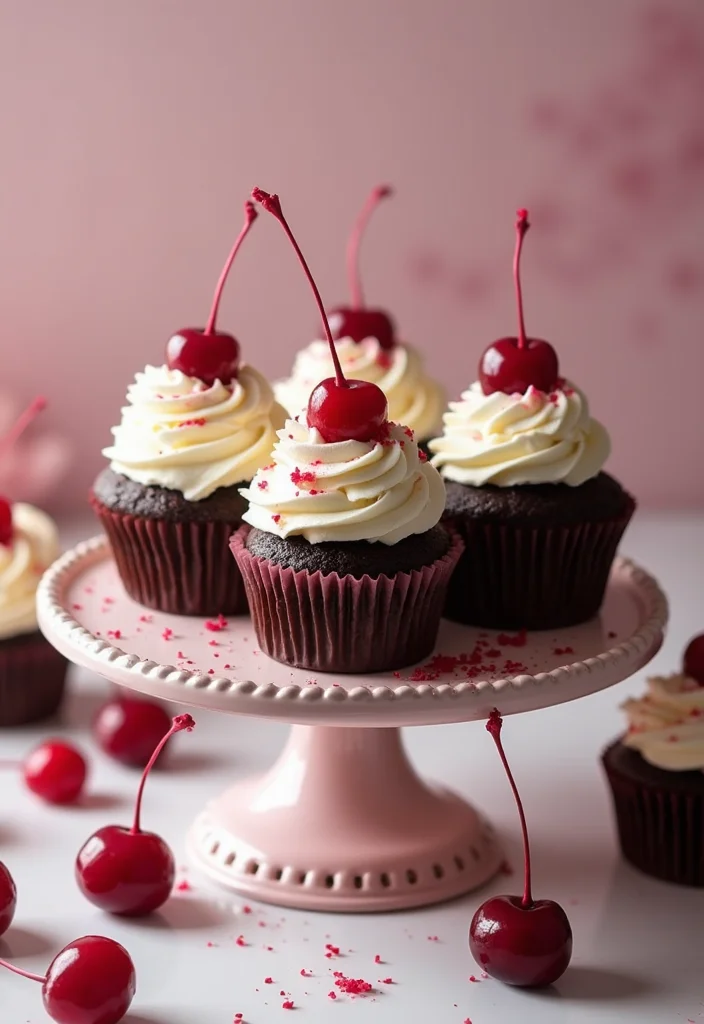
Cupcakes are a fun and delightful way to serve individual portions of Black Forest cake. These cupcakes feature moist chocolate cake topped with whipped cream and cherries, perfectly portioned for any gathering.
The individual servings are easy to customize with different toppings, making them versatile for any occasion. A simple drizzle of chocolate on top could make them even more special!
Preparation Overview:
– Servings: 12 cupcakes
– Prep Time: 25 minutes
– Cook Time: 20 minutes
– Total Time: 45 minutes
– Calories: Approximately 300 per cupcake
Nutrition Information (per cupcake):
– Fat: 15g
– Carbohydrates: 38g
– Protein: 4g
Ingredients:
– 1 ½ cups all-purpose flour
– 1 cup sugar
– ½ cup unsweetened cocoa powder
– 2 large eggs
– ½ cup buttermilk
– ½ cup vegetable oil
– 1 cup heavy cream (for topping)
– Fresh cherries for decoration
Instructions:
1. Preheat your oven to 350°F (175°C) and line a cupcake pan with liners.
2. Combine flour, sugar, cocoa powder, baking powder, and baking soda in a bowl.
3. In another bowl, mix eggs, buttermilk, and oil, then combine with dry ingredients.
4. Fill cupcake liners 2/3 full and bake for 18-20 minutes.
5. Cool before topping with whipped cream and cherries.
– Use a pastry bag for an elegant whipped cream topping.
– Add chocolate shavings for extra flair.
FAQs:
Q: Can I use egg substitutes for these cupcakes?
A: Yes, you can use applesauce or flaxseed meal as a substitute for eggs.
20. Chocolate Peanut Butter Dream
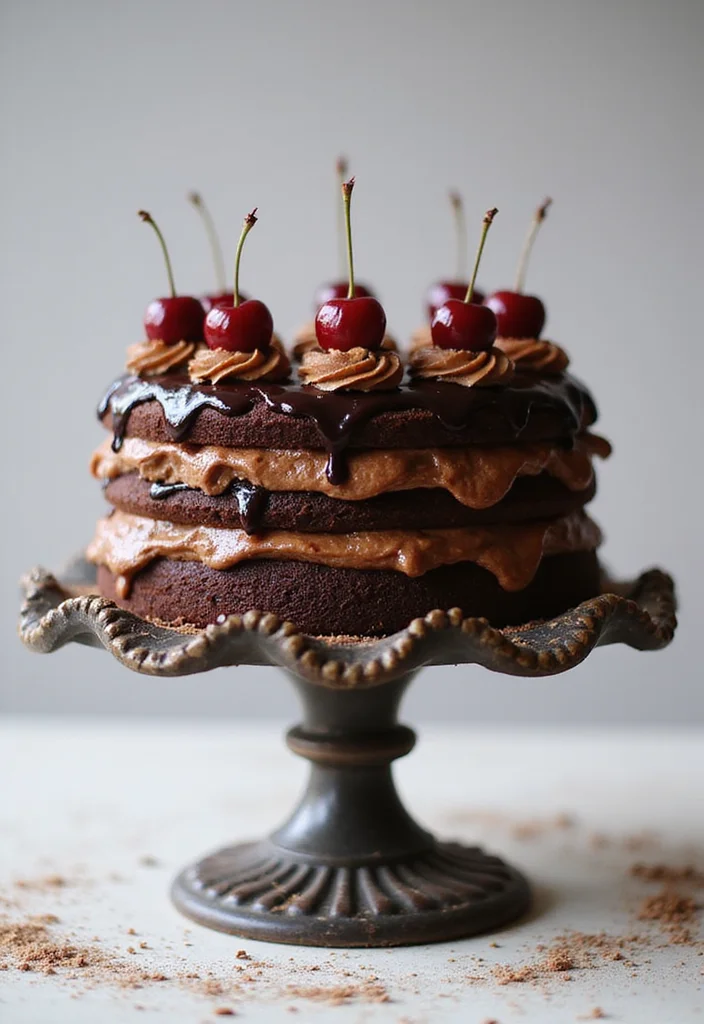
Satisfy your cravings with a Chocolate Peanut Butter Black Forest cake that combines the rich taste of chocolate with creamy peanut butter. Each layer features a luscious peanut butter filling that complements the chocolate and cherry layers perfectly.
This dessert is decadent and perfect for those who can’t get enough peanut butter in their lives. Each bite is a scrumptious fusion of flavors that will have your taste buds dancing!
Preparation Overview:
– Servings: 10-12
– Prep Time: 1 hour
– Cook Time: 30 minutes
– Total Time: 90 minutes
– Calories: Approximately 540 per slice
Nutrition Information (per slice):
– Fat: 30g
– Carbohydrates: 50g
– Protein: 8g
Ingredients:
– 1 ½ cups all-purpose flour
– 1 cup sugar
– ½ cup unsweetened cocoa powder
– 2 large eggs
– ½ cup buttermilk
– ½ cup vegetable oil
– 1 cup heavy cream (for frosting)
– 1 cup creamy peanut butter
– Fresh cherries for decoration
Instructions:
1. Preheat your oven to 350°F (175°C) and prepare two 9-inch round cake pans.
2. In a bowl, mix flour, sugar, cocoa powder, baking powder, and baking soda.
3. In another bowl, combine eggs, buttermilk, and oil, mixing well until smooth.
4. Bake for 30-35 minutes. Cool completely.
5. Whip the heavy cream and combine with peanut butter for frosting.
6. Layer the cakes with peanut butter frosting and cherries.
7. Frost the top and sides of the cake with remaining mixture.
– Adjust the amount of peanut butter in frosting to suit your taste.
– Add crushed peanuts for an extra crunch.
FAQs:
Q: Can I use crunchy peanut butter?
A: Yes, crunchy peanut butter adds a great texture to the frosting.
Fun fact: Peanut butter filling adds about 20% more creaminess to chocolate layers, making Chocolate Peanut Butter Black Forest cakes irresistibly rich. For best balance, keep the filling a tad thinner than the chocolate layers and pair with bright cherry accents.
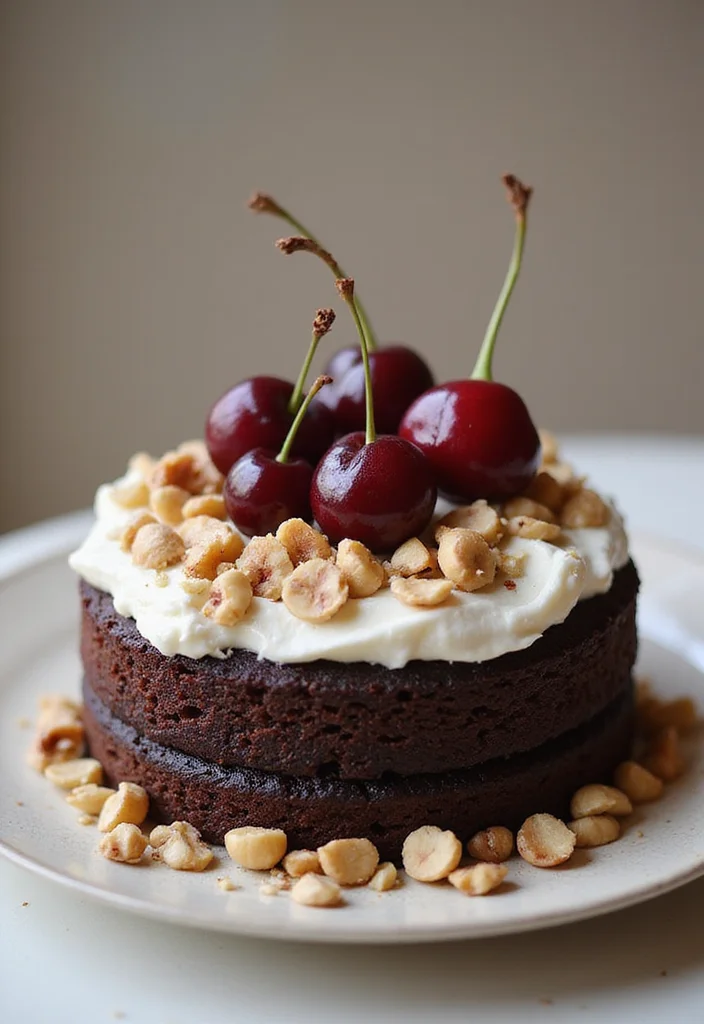
21. Nutty Chocolate Crunch
Wrap up your Black Forest cake adventure with a nutty chocolate crunch design! This cake incorporates crushed nuts—think almonds or hazelnuts—into the layers and on top for a satisfying texture.
Nuts enhance the flavor profile and provide a fun textural contrast to the creamy elements. It’s a fantastic way to elevate your cake while impressing your guests!
Preparation Overview:
– Servings: 10-12
– Prep Time: 45 minutes
– Cook Time: 30 minutes
– Total Time: 75 minutes
– Calories: Approximately 480 per slice
Nutrition Information (per slice):
– Fat: 28g
– Carbohydrates: 45g
– Protein: 7g
Ingredients:
– 1 ½ cups all-purpose flour
– 1 cup sugar
– ¾ cup unsweetened cocoa powder
– 2 large eggs
– ½ cup buttermilk
– ½ cup vegetable oil
– 1 cup chopped nuts (almonds or hazelnuts)
– 1 cup heavy cream
– Fresh cherries for decoration
Instructions:
1. Preheat oven to 350°F (175°C) and prepare two 9-inch round cake pans.
2. In a bowl, mix flour, sugar, cocoa powder, baking powder, and baking soda.
3. Add in eggs, buttermilk, and oil, mixing until smooth.
4. Fold in chopped nuts.
5. Divide the batter into prepared pans and bake for 30-35 minutes.
6. Cool completely, then layer with whipped cream and cherries.
7. Frost the top and sides, garnishing with more nuts and cherries.
– Toast the nuts for deeper flavor.
– Ensure the cake cools completely before frosting to avoid melting.
FAQs:
Q: Can I use different types of nuts?
A: Absolutely! Feel free to experiment with your favorites like walnuts or pecans.
Conclusion
There you have it—a delightful journey through 21 jaw-dropping Black Forest cake designs that will impress any dessert enthusiast. From classic elegance to modern twists, each cake offers a unique take on this timeless favorite.
Whether you’re hosting a special occasion or simply looking to satisfy your sweet tooth, these designs inspire creativity and deliciousness in your baking adventures. Share your creations or try something new and remember that the best cakes are made with love!
Frequently Asked Questions
What Are Some Creative Ideas for Black Forest Cake Designs?
If you’re looking to impress your friends with stunning black forest cake designs, the options are endless! Consider incorporating fresh cherries or whipped cream to add a pop of color and texture. You could also try using chocolate curls or edible gold leaf for an elegant touch. Don’t forget to experiment with different tiers and layering styles to create a truly jaw-dropping centerpiece!
What Are Some Essential Decorating Tips for Black Forest Cakes?
When decorating a black forest cake, remember that presentation is key! Start with a smooth base of chocolate ganache or buttercream for a polished look. Use a piping bag to create beautiful swirls of whipped cream around the edges. Adding chocolate shavings and cherries not only enhances flavor but also creates visual appeal. Lastly, consider using a cake stand to elevate your dessert and show off those stunning designs!
What Ingredients Are Essential for Making an Authentic Black Forest Cake?
An authentic black forest cake requires a few key ingredients. You’ll need dark chocolate for the cake layers, heavy cream for whipping, and of course, kirsch (cherry schnapps) to soak the cake layers. Don’t forget the maraschino cherries for topping! Each ingredient plays a vital role in achieving that rich, indulgent flavor profile that this classic dessert is known for.
How Can I Make My Black Forest Cake Stand Out at a Gathering?
To make your black forest cake the star of the show, consider adding unique elements like layered fruit compotes between the cake layers for added flavor and texture. You could also customize the design with themed decorations for special occasions, like festive sprinkles or seasonal fruits. Presentation matters, so make sure to plate it beautifully and serve with a side of fresh whipped cream for that extra wow factor!
Can I Use Alternative Ingredients for a Healthier Black Forest Cake?
Absolutely! If you’re looking to create a healthier version of a black forest cake, consider using whole wheat flour instead of all-purpose flour and substituting Greek yogurt for some of the cream to reduce fat content. You can also sweeten the cake with natural sweeteners like honey or maple syrup. Don’t forget to keep the traditional flavors intact by incorporating cocoa powder and using fresh cherries for topping!
Related Topics
black forest cake designs
baking inspiration
decorating tips
chocolate desserts
advanced baking
creative cake art
party desserts
showstopper cakes
easy cake decorating
homemade treats
dessert ideas
themed baking